
If you're reading this, there's a fair chance you've already gone past supermarket coffee, bought a grinder, and started caring about brew method, water, and freshness. The next itch is usually the same one I hear from home baristas all the time. If fresh coffee makes such a difference, why stop at grinding?
That question is what pulls people into home coffee roasting equipment. It isn't only about saving money or adding another gadget to the counter. It's about taking control of the one stage that shapes flavour more profoundly than often recognised. Roast your own coffee and you choose how bright, sweet, chocolatey, nutty, or developed you want it to be.
In the UK, though, there's a catch. Most online advice assumes you have a big garage, detached house, or outdoor workspace. A lot of people here don't. They've got a flat kitchen, a terraced house with close neighbours, or a utility room with limited airflow. That changes what counts as sensible equipment.
A practical home setup has to fit your coffee habits, your budget, and your living space. It also has to work safely. If you're still building your wider coffee station, it helps to look at a complete home barista setup so the roaster, grinder, storage and brew gear all make sense together.
Table of Contents
- The Ultimate Step in Your Coffee Journey
- Understanding the Main Types of Coffee Roasters
- Key Features to Evaluate in a Roaster
- Essential Accessories for Your Roasting Setup
- Setup Safety and Ventilation for Home Coffee Roasting Equipment
- A Sample Home Roast Workflow From Bean to Brew
- Price Brackets and a Final Buying Checklist
The Ultimate Step in Your Coffee Journey
A lot of people reach this point after they have sorted their grinder, dialled in a brew method they trust, and started buying better beans. Then the next question lands. Roast your own, or keep buying roasted coffee?
In a typical UK home, that question is not only about flavour. It is about whether you can roast without filling a small kitchen with smoke, whether your extractor fan is up to the job, and whether a machine will fit on a worktop that already carries a kettle, toaster, and brewing kit. In a flat or terrace, those practical limits matter as much as the cup.
Home roasting gives you control at the stage that shapes flavour most. You decide when the coffee becomes fresh-roasted, how far to develop it, and whether a bean is aimed at filter, espresso, or milk drinks. Green coffee also stores far better than roasted coffee, so you are not racing the clock in the same way.
That control has a cost in effort. Roasting is not hard to start, but it does ask for attention, cooling, cleaning, and somewhere sensible to do it.
The running cost of electricity is usually not the part that catches beginners out. Instead, the main limits are batch size, smoke, odour, and repeatability. A small machine may roast good coffee, but if you drink a lot at home, or two people are getting through espresso every day, frequent roasting soon becomes part of the routine rather than an occasional hobby session.
I see the same buying mistakes regularly. Someone chooses a compact roaster because it looks tidy, then discovers it still needs more ventilation than their kitchen can offer. Someone else buys the cheapest route in, then gets tired of inconsistent batches and awkward cooling. Both problems are avoidable if you match the roaster to your home first, not only to your budget.
Three questions usually make the decision clearer:
- How much coffee do you consume each week? Small batch machines can feel slow if you are roasting for more than one person.
- Where will you roast? A balcony, open back door, garage, or well-positioned kitchen window changes what is realistic.
- How hands-on do you want the process to be? Some roasters reward constant input. Others suit people who want more predictable results with less intervention.
Yield matters too. Green beans lose weight during roasting, so the amount you store and brew is always less than the amount you start with. That catches beginners by surprise, especially if they plan to roast only once a week.
For coffee drinkers building a more capable setup at home, roasting can be the next logical step after grinding and brewing are sorted. It sits well alongside a practical home barista setup for UK kitchens, but only if you have a realistic plan for smoke, cooling, and storage.
Home roasting is rewarding for people who enjoy process and want more say over flavour. It is less suitable for anyone expecting a clean, silent, odour-free appliance experience.
Understanding the Main Types of Coffee Roasters
DIY methods
This is the cheapest way in. Think pan roasting, oven roasting, or improvised drum setups. They can work, and they do teach you how beans change colour, smell, and sound through the roast.
What they don't give you is much consistency.
Pros
- Low cost entry. Good if you want to test the hobby before buying purpose-built equipment.
- Hands-on learning. You notice roast stages quickly because nothing is hidden.
- Flexible location. Some DIY methods can be done outdoors with the right setup.
Cons
- Uneven results. It's easy to tip into scorched outsides and underdeveloped centres.
- High mess factor. Chaff and smoke can spread fast.
- Poor repeatability. Recreating a good batch is much harder than people expect.
DIY methods suit the curious tinkerer. They don't suit someone who wants a neat, controlled countertop routine.
Popcorn poppers
A popcorn popper is often the true budget gateway into home roasting. It moves hot air through the beans and can roast quickly, but control is basic and capacity is small.
For beginners, the biggest benefit is speed. You hear first crack clearly, you see colour changes fast, and you get a direct feel for how coffee reacts to heat. The downside is that these machines are not designed around coffee workflow.
- Affordable starting point if you want experience before a larger purchase
- Quick roasting that makes roast stages easy to spot
- Small footprint for homes without much storage space
But there are compromises:
- Limited control over roast profile
- Small useful output, which becomes tiring if you drink a lot of coffee
- More chaff and smoke management than many buyers expect
For many UK users, the mismatch often originates from practical considerations. A popper looks compact and harmless, but in a flat kitchen it can still create more mess and odour than expected.
Drum roasters
A drum roaster works more like a miniature tumble dryer for coffee. Beans rotate in a heated drum, which usually gives more even development and better control over roast progression than simple air methods.
This is the category that attracts people who want to grow with the hobby. It tends to offer more control, better profiling, and more realistic long-term use if you roast regularly.
| Type | What it does well | Where it gets difficult |
|---|---|---|
| Smaller drum roasters | Better control and more even roasting | Still need ventilation and careful batch planning |
| Larger home drum roasters | More useful output for regular drinkers | Cost, size, and smoke become bigger factors |
A drum roaster usually makes more sense when you care about repeatability and want to learn one machine properly over time.
Drum roasting often rewards patience. The learning curve is steeper than with a simple popper, but the ceiling is much higher too.
Fluid bed roasters
A fluid bed roaster suspends beans in hot air. The easiest way to picture it is a very focused, coffee-specific hot air system. These machines are often clean to use, fast to heat, and straightforward to maintain.
Many people like them because they're direct. They warm up quickly, often produce bright and lively roasts, and usually make bean movement easy to observe.
What works well
- Fast roasting style with clear audible cues
- Easy cleaning compared with more complex machines
- Compact format that often suits home counters better
What can put people off
- Noise can make crack detection harder on some machines
- Smaller batch feel compared with larger drum options
- Less forgiving profile changes if you're chasing a specific roast style
For UK buyers, fluid bed roasters can be attractive where space is tight, but they still don't remove the need for airflow planning. Small machine doesn't mean smoke-free machine.
Key Features to Evaluate in a Roaster
Saturday morning in a UK flat is often where buying mistakes show up. The roast is louder than expected, the kitchen smells smoky for hours, and the batch that looked generous on the box barely covers a few days of coffee. A useful roaster is the one that fits your space, your ventilation limits, and the amount you drink.
Capacity is rarely what the label suggests
Capacity catches beginners out more than almost anything else. Manufacturers usually state the maximum load a machine can take, not the batch size that gives the cleanest and most repeatable result.
Scott Rao makes the point clearly in his guide to choosing a roasting machine. Real working capacity is often lower than the headline figure, and roasted coffee weighs less than the green coffee you started with. In practice, that means a machine advertised for a larger batch may still be best used below that level if you want steadier development and fewer uneven beans.
This matters in a typical British home because small-batch roasting sounds manageable until you work out the weekly routine. If two people are drinking espresso every day, a modest home roaster can mean several roasts a week. If the machine only performs well at the lower end of its stated capacity, that workload goes up again.
Buy for roasted output. Buy for how often you are willing to roast. Those two questions are usually more useful than the headline capacity.
If you are already tightening up your espresso setup, the same principle applies after roasting. Fresh coffee only shows its best with a grinder that can keep up, which is why many buyers pair a roaster with a home burr grinder suited to fresh coffee.
Control, cooling and clean-up
Control range decides how much room you have to correct a roast as it develops. Simple machines with basic heat settings can still produce good coffee, but they leave less margin for adjustment if the beans are racing toward first crack or stalling in the middle. Digital control and saved profiles help if repeatability matters. Manual controls can suit people who prefer to roast by eye, sound, and smell, but they ask more of the operator.
Cooling is easy to underestimate. In a small kitchen, you want the roast to stop promptly once the beans come out. Weak cooling lets the coffee keep developing, which blurs the finish and makes back-to-back consistency harder. I would treat cooling performance as a buying point, not a bonus feature.
Then there is the part many first-time buyers skip. Cleaning.
Chaff builds up quickly, oils bake onto hot surfaces, and awkward machines become irritating after the novelty wears off. In a terraced house or flat, where you are likely roasting close to where you cook, good chaff collection and straightforward cleaning make a bigger difference than glossy app features.
Check these points before you buy:
- Useful batch size. Ask what the machine roasts well, not just what it can physically hold.
- Heat and airflow control. More adjustment gives you more ways to correct a roast.
- Cooling speed. Fast cooling makes it easier to stop the roast where you intended.
- Chaff handling. Better collection means less mess around the kitchen and less time cleaning up.
- Noise level. Loud machines can make cracks harder to hear, which matters if you roast by sensory cues.
- Cleaning access and spare parts. Removable trays, clear access to the roast path, and available consumables save frustration later.
One useful distinction for beginners. Products such as Douwe Egberts Cafitesse Strong Roast Liquid Coffee are made for a different job entirely. They are prepared coffee products for dispensing systems, not alternatives to buying a roaster and learning to roast green beans at home. That sounds obvious, but it helps to separate coffee formats from coffee-making equipment when comparing options online.
Essential Accessories for Your Roasting Setup
A roaster on its own won't give you a calm first roast day. The small supporting tools are what stop the usual beginner problems, such as inconsistent batch weight, slow cooling, stale storage, or forgetting what happened in the last batch.
The tools that stop beginner mistakes
Start with the basics that affect every batch.
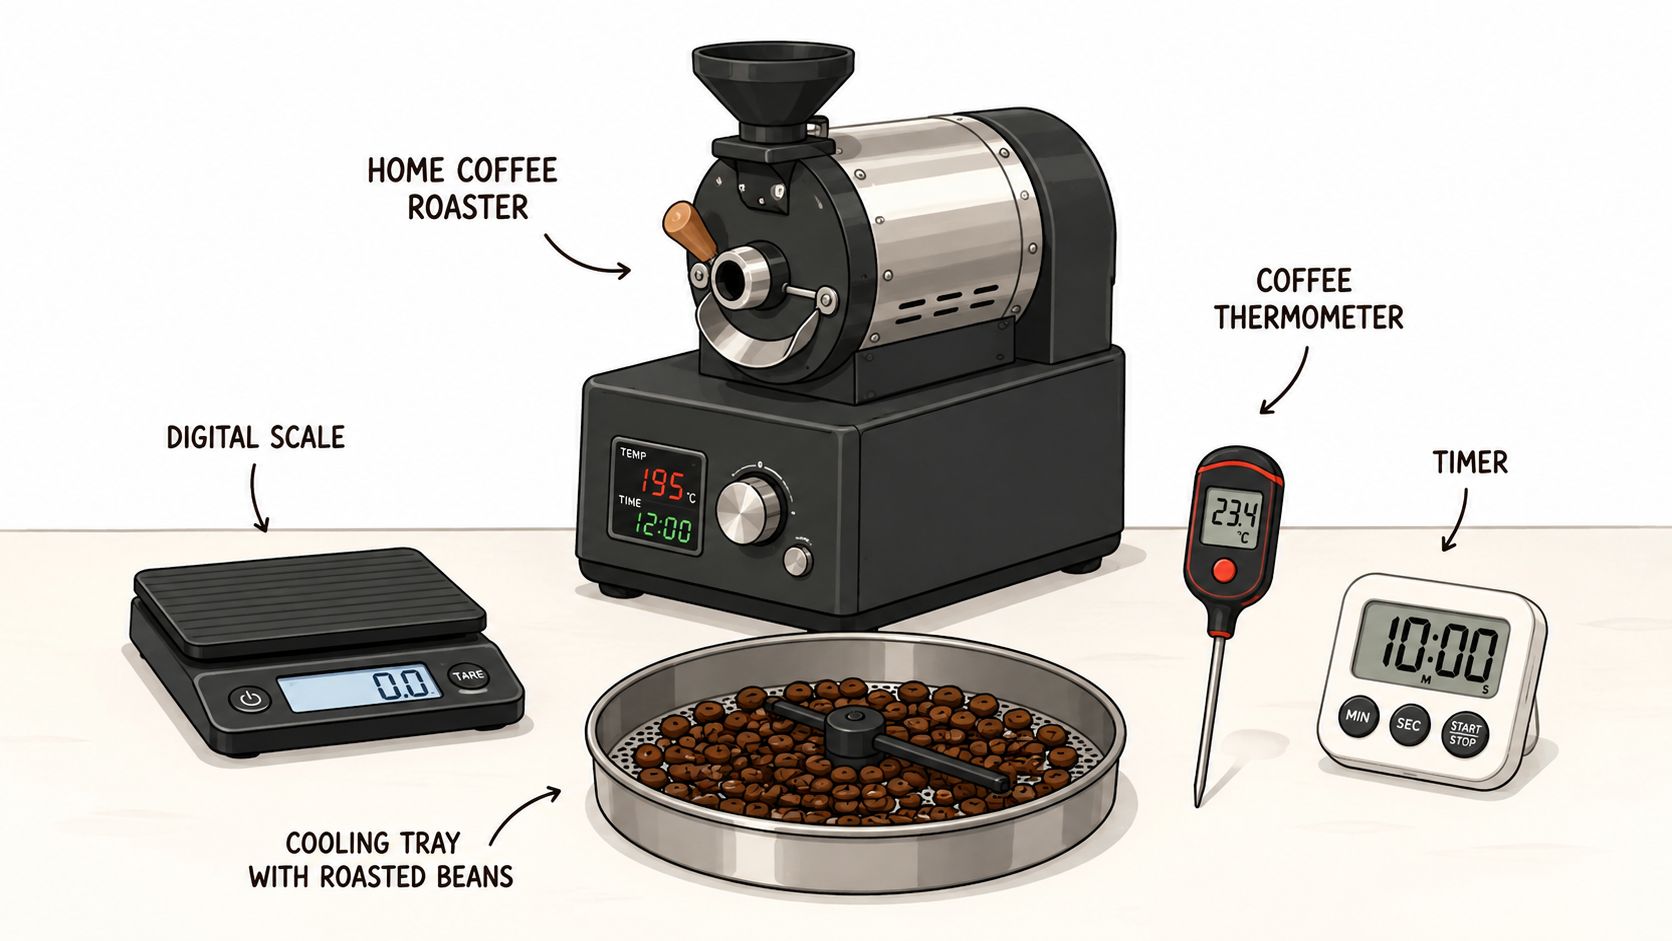
- A digital scale. Roast consistency starts before the heat goes on. You need to weigh green coffee accurately and check roasted yield afterwards.
- A timer. Even if your roaster has one, a separate timer keeps your notes cleaner and your attention sharper.
- A cooling setup. Some machines cool well enough on their own. Some don't. If cooling is weak, a separate tray or sieve-based cooling method helps stop the roast cleanly.
- A notebook or roast log. If a roast tastes great and you haven't recorded anything, you've made life harder for yourself.
For manual or semi-manual setups, a thermometer can also be useful. Not every beginner needs one straight away, but once you start comparing batches, extra roast data becomes more helpful.
Storage and brewing still matter
The work doesn't stop when the beans are brown. Roasted coffee needs proper storage and a bit of patience before brewing. Many home roasters use an airtight container once the coffee has rested, and a dedicated vacuum canister for coffee is one simple option if you want a tidy storage step built into your routine.
A practical shopping list usually looks like this:
| Accessory | Why it matters |
|---|---|
| Green coffee supply | You need beans suited to experimentation and repeat ordering |
| Scale | Keeps batch size repeatable |
| Cooling tray or equivalent | Stops carryover roasting |
| Storage container | Protects rested beans from air and kitchen odours |
| Burr grinder | Lets you taste the roast properly |
Fresh roasting deserves good grinding. A poor grinder can hide the difference between an average roast and a very good one.
One more point often missed. Accessories affect workflow more than people expect. If your cooling method is clumsy, your notes are scattered, and your storage is an afterthought, roasting starts to feel like hassle rather than hobby. A simple, organised station makes it much easier to keep going.
Setup Safety and Ventilation for Home Coffee Roasting Equipment
Saturday morning in a second-floor flat. The beans are nearing first crack, the kitchen is warming up, and the smell has already reached the hallway. That is the point where a home roasting setup succeeds or fails in the UK. In many British homes, the limiting factor is not roast control. It is whether you can handle smoke, odour, heat, and power safely without upsetting the household or the neighbours.

Why UK homes need a different plan
A lot of roasting advice assumes you have a garage, a utility room, or outdoor space that is easy to use year-round. Plenty of UK buyers do not. They have a galley kitchen in a terrace, a small extractor hood that recirculates rather than vents outside, or one window that opens onto a shared path or courtyard.
That changes the equipment decision.
Coffee roasting creates smoke, drifting chaff, strong odour, and a surprising amount of residual heat. A setup that feels manageable in a detached house can become a nuisance, or a genuine risk, in a compact flat. Small batch size helps, but it does not remove the problem. Even modest home roasters can set off alarms, leave smells in soft furnishings, and make a kitchen uncomfortable if the airflow is poor.
Start with the room, not the roaster. Check whether your cooker hood extracts outdoors, how far smoke has to travel to leave the room, and whether you can keep a clear area around the machine while it is hot.
Choosing a sensible roasting position
Treat the setup like any other heat-producing appliance. It needs a stable surface, space around it, and a practical route for smoke to leave the room.
Good options usually include:
- A worktop near an externally vented cooker hood, where the fan pulls air outside rather than through a charcoal filter
- A position beside an open window with extra extraction, so smoke leaves the room instead of circulating back through the kitchen
- A garage, shed, or covered outdoor spot, provided the surface is dry, level, and sheltered from wind and rain
Poor options are common in first-time setups:
- Under low wall cupboards
- Next to paper towels, cardboard, or food packaging
- In a cramped kitchen corner with no direct airflow path
- In communal internal spaces, where odour lingers and quickly becomes other people's problem
If you are trying to improve a difficult room, professional advice on home ventilation is a useful reference. The article is not coffee-specific, but the extraction and air movement principles are directly relevant to roasting in a flat or terrace.
Power matters too. Many beginners focus on smoke and forget the electrical side. Roasters are heat-heavy appliances, and it helps to understand how much power coffee machines use before plugging one into an overloaded kitchen circuit or a bargain extension reel.
A quick visual walkthrough helps if you're planning your setup at home:
Basic safety rules that matter in practice
The mistakes are usually simple.
- Have a smoke plan before you switch on. An open window after the room is already hazy does very little.
- Keep the chaff collector clean. Chaff is light, dry, and easy to ignore until it builds up.
- Use a proper wall socket where possible. If you must use an extension, it needs to be suitable for the load and fully uncoiled.
- Stay with the roaster from charge to cooling. The final stretch moves quickly, especially on smaller machines.
- Let the machine cool fully before storing it or covering it
- Keep children and pets out of the immediate area during the roast and cooldown
One detail beginners often miss is odour spread after the roast. The smoke may clear, but the smell can sit in curtains, coats, and soft furnishings for hours. In a typical British home, that is often the reason people move roasting to a garage or covered outdoor space once they have tried a few kitchen batches.
Ventilation is part of the buying decision. If your home cannot give you a safe position with clear airflow and sensible power use, the honest answer may be to roast outdoors in suitable weather, choose a lower-smoke setup, or wait until the space is better suited to it.
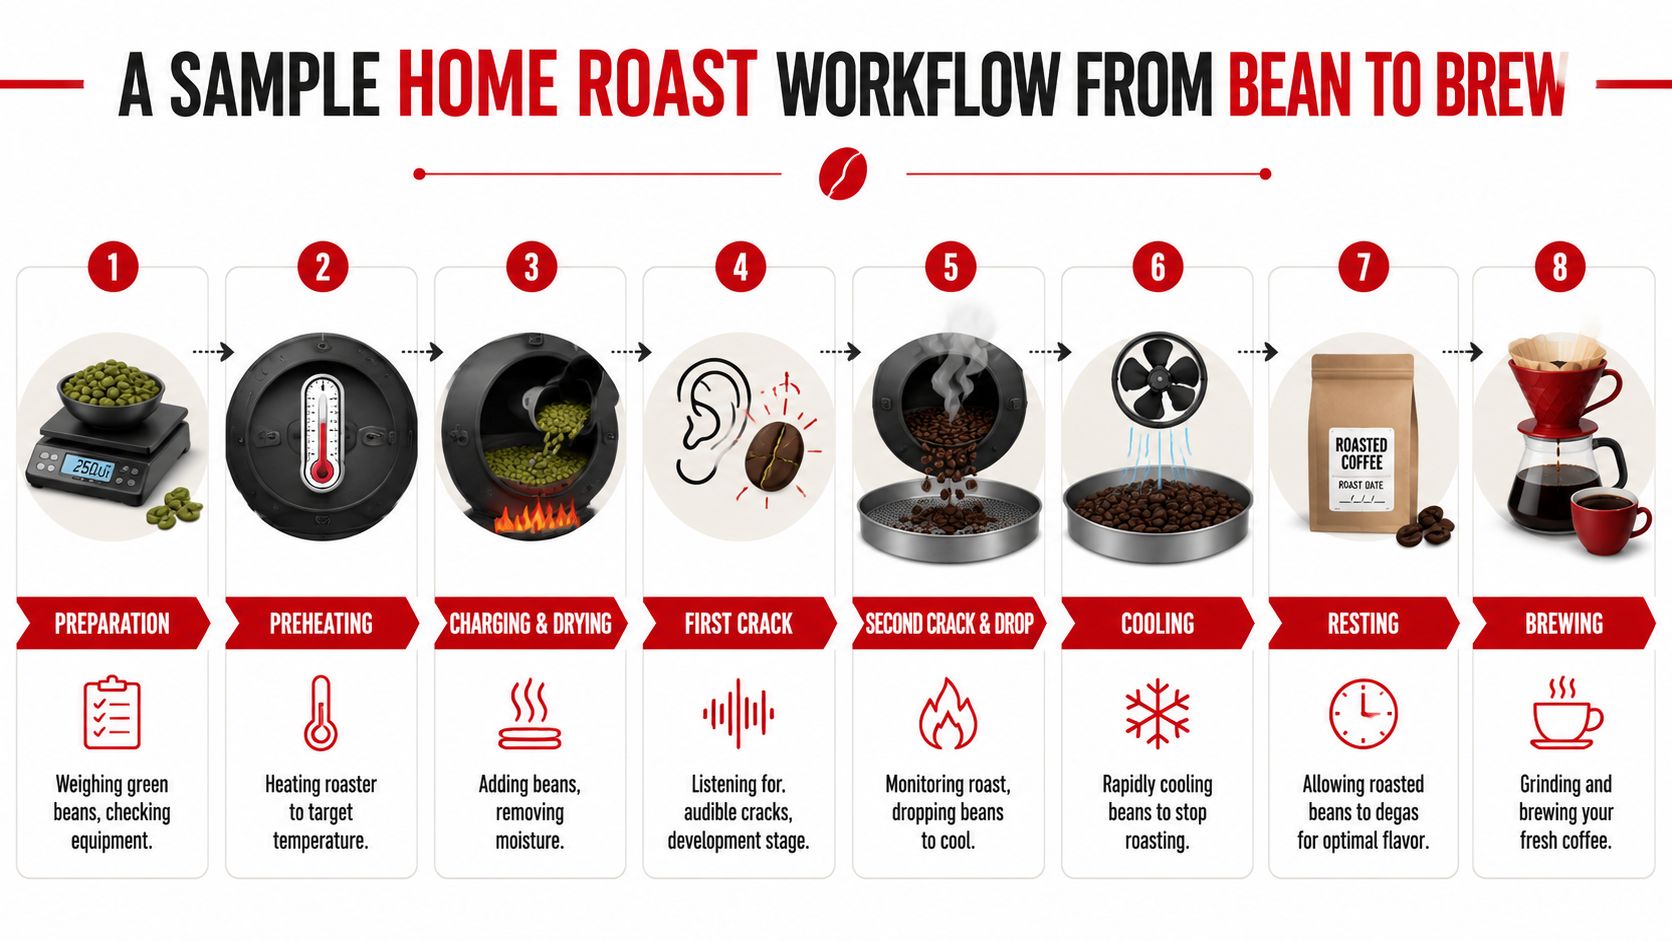
A Sample Home Roast Workflow From Bean to Brew
It is 8pm in a UK flat, the washing-up is done, and there is just enough time for one batch before the smell settles into the kitchen. That is how home roasting often starts. A short window, limited space, and no room for a muddled workflow.
Good results come from a repeatable routine. For a beginner, that matters more than chasing a perfect roast profile on day one.
Before the heat goes on
Lay out everything before you switch the machine on. Green coffee, scales, timer, heatproof gloves if you use them, a cooling setup, a container for the finished beans, and a notebook or app for roast notes. Check the drum, chamber, or roast tube is clean, and empty the chaff collector.
That bit of preparation saves the roast later. Small home machines move quickly near first crack, and in a typical British kitchen there is rarely much spare worktop space to improvise. If you are clearing a corner for cooling while the beans are still roasting, the batch is already getting away from you.
The roast itself
The first few minutes are usually quieter than beginners expect. Green coffee smells grassy and dry at first. Then the beans lose that raw smell, turn yellow, and start giving off a sweeter, bready aroma. Those changes are useful markers, especially on simpler machines where temperature readings are limited or a bit delayed.
First crack is the point to pay close attention. You are listening for clear pops, not a faint rustle from the fan or extractor nearby. On small domestic roasters, the gap between first crack starting and the roast running darker than planned can be short, so it pays to know your finish point before you get there.
A sensible first workflow looks like this:
- Weigh the batch to suit the machine, not the amount you hope to drink that week.
- Preheat if the manufacturer calls for it so the roast starts consistently.
- Load the beans and start timing from the same point each batch.
- Track colour, smell, and sound instead of staring only at the display.
- End the roast deliberately once you reach the level you wanted, then cool at once.
A medium roast is usually the best place to learn. It gives enough development to taste sweetness and body, but it leaves room to spot roast faults in the cup. Very dark roasts can hide mistakes. Very light roasts can be hard to judge on entry-level equipment.
If your machine logs data, use it to compare batches rather than to chase someone else's curve. Repeatability is what makes software useful at home.
Batch size also changes the whole routine. Some compact home roasters produce only a modest amount per session, so anyone getting through a lot of coffee each week needs to factor in back-to-back batches, cooling time, and the extra smell that creates indoors. That is often the point where a machine that looked tidy on paper feels less practical in a terraced house or flat.
Cooling, resting and brewing
Cool the beans as fast as the machine allows. Leaving them in a hot roasting chamber, or tipping them into a deep bowl, lets the roast keep developing after you thought it had finished. That is one of the most common beginner errors I see.
Then leave the coffee alone for a bit. Freshly roasted beans can smell superb and still brew poorly if they are used too soon. Proper storage matters as well, especially if you are roasting small batches through the week rather than one large batch at the weekend. This guide on how to store coffee beans after roasting at home covers that part well.
The first brew tells you what the roast did. If it tastes sharp and thin, the roast may have been underdeveloped. If it tastes flat, ashy, or one-dimensional, you probably pushed too far. Make one adjustment at a time on the next batch and keep the notes simple. Bean, batch size, key roast marker, finish point, and cup result are enough.
That is how guesswork turns into a process you can trust.
Price Brackets and a Final Buying Checklist
The home market now has clear entry points. Small home roasters are widely priced from about $200 to $5,000, while commercial café roasters start around $5,000 and can exceed $50,000, with industrial machines above that, according to CoffeeTec's guide to coffee roasting machine costs. For UK shoppers, a practical shorthand is that home roasters commonly range from around £150 to £4,000, while commercial units start at £4,000+, based on the same market guidance.
How the market usually breaks down
Lower entry level
This category includes DIY methods, adapted poppers, and simpler small electric machines. They let you learn the basics without a huge spend, but they usually ask for compromise on control, output, or smoke handling.
Mid-range home use
This is often the sweet spot for people who know they'll keep roasting. You tend to get more useful controls, better build, and a workflow that feels less improvised.
Upper-end prosumer
At this stage, home equipment starts to resemble small professional gear. You pay for control, repeatability, logging, and better long-term usability. You also need the space and ventilation to justify it.
One reality matters across all budgets. Small batches change the true economics of the hobby. A machine that roasts around 120g at a time may be fine for occasional use, but it becomes time-heavy if your household drinks coffee daily. The more often you roast, the more important capacity and workflow become.
Final checklist before you buy
Ask yourself these before you commit:
- Where will I roast? If the answer is vague, stop there and solve that first.
- How much coffee do I get through each week? Buy for realistic output, not ambition.
- Do I want manual involvement or push-button repeatability?
- Can I cool, store, and grind the coffee properly once it's roasted?
- Does my budget include accessories, not just the roaster?
- Will this machine still suit me once the novelty wears off?
The right home coffee roasting equipment isn't the most advanced machine you can afford. It's the one you can use safely, consistently, and often enough to enjoy.
If you're weighing up grinders, storage, brewing gear, or the wider setup around home roasting, Allied Drinks Systems is a practical UK source for coffee equipment and supplies. It's especially useful if you want your roasting kit to fit into a complete home barista workflow rather than buying each piece in isolation.
