
When your daily brew is disrupted by a machine on the blink, a bit of careful diagnosis is the first and most important step. More often than not, the problem is something simple—a blocked water tank or a dodgy setting—not a major mechanical failure. Taking a moment to assess the symptoms before you even think about reaching for the tools can save you a world of time, money, and stress, making this guide to coffee machine repair your first port of call.
Diagnosing Your Coffee Machine Problem
Before you jump to the worst-case scenario, a methodical approach to troubleshooting can reveal what’s really going on. Most coffee machine faults fall into a handful of common categories. Ruling out the easy fixes first will build your confidence and help you figure out if it's a DIY job or one for the professionals. A calm, step-by-step diagnosis is the foundation of any successful repair.
But first, the most critical step of all: safety. Before you inspect any internal parts, you absolutely must unplug the machine from the wall. This simple action eliminates any risk of electric shock while you work. Once it's disconnected, you can start your checks without a worry.
This simple decision tree shows a typical diagnostic path for a machine that won't power on, starting with the most basic checks.
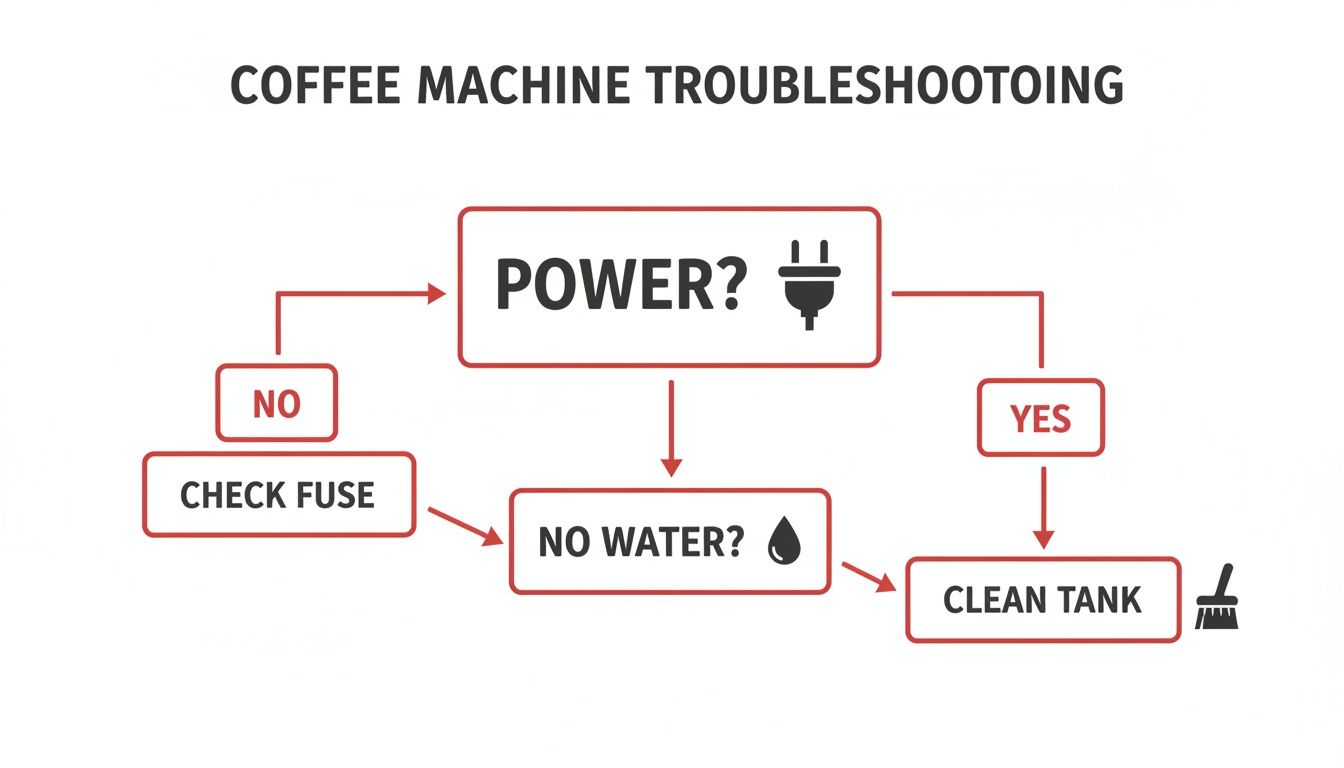
As the flowchart shows, it's the fundamentals like a blown fuse or an empty water tank that are often the culprits behind a seemingly dead machine.
Common Symptoms and What to Check First
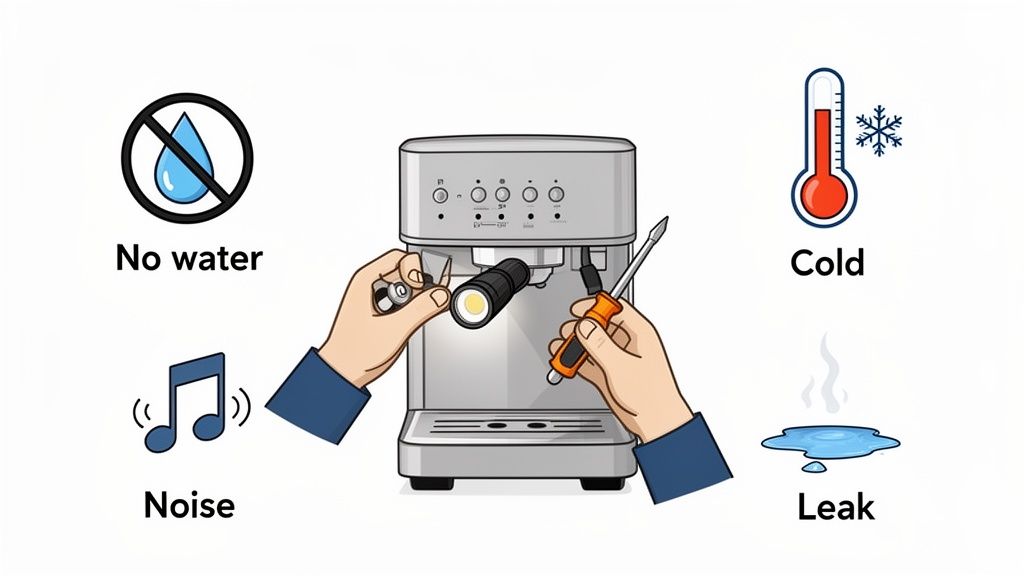
Let’s zero in on what the machine is actually doing—or not doing. Different symptoms point to different problems, so paying close attention here is key. Is it completely silent and cold, or is it making strange noises? This quick reference table can help you match a common symptom to its likely cause and point you in the right direction.
| Symptom | Possible Cause (Espresso Machine) | Possible Cause (Bean-to-Cup) | Possible Cause (Filter Machine) | First Action to Take |
|---|---|---|---|---|
| No Power | Blown plug fuse or internal thermal fuse. | Faulty power switch or internal fuse. | Blown plug fuse or broken power cord. | Check the plug, fuse, and wall socket are all working. |
| No Water Flow | Blocked group head or steam wand. | Airlock in the system or blocked brew unit. | Clogged water intake or outlet. | Ensure the water tank is full and seated correctly. |
| Coffee is Cold | Failed heating element or thermostat. | Faulty thermoblock or temperature sensor. | Broken heating element or thermal cutout. | Check for limescale build-up; run a descaling cycle. |
| Strange Noises | Worn-out pump or grinder burrs. | Jammed grinder or failing pump. | Gurgling sound from a blockage. | Turn off and inspect for any visible blockages or jams. |
| Leaking Water | Perished group head gasket or hose seal. | Cracked internal hose or drip tray seal. | Cracked carafe or water reservoir. | Check all seals, gaskets, and the water tank for cracks. |
By working through these basic checks, you can often solve the problem without needing to open the machine at all. It’s all about isolating the fault through a simple process of elimination.
Understanding these diagnostic principles is the key to success. Whether you're dealing with a coffee machine or complex industrial equipment, the core challenge remains the same: accurate diagnosis. For a deeper dive into identifying and resolving equipment issues, you can explore these effective maintenance problem-solving strategies.
Fixing Common Espresso Machine Faults
An espresso machine, with all its pumps, boilers, and valves, can look a bit daunting when it stops playing ball. But here’s a secret from years in the trade: a huge number of problems that plague these machines are surprisingly easy to sort out yourself. Getting a basic feel for how they work is the first step, and it’ll empower you to fix everything from watery shots to a complete loss of pressure.
More often than not, the fault isn’t a broken part but a simple blockage. Coffee oils, fine grounds, and limescale are the usual suspects behind poor performance. A bit of systematic thinking, starting with the easiest fixes, can often save you the cost of calling out a technician.
Poor Extraction and Watery Shots
It’s one of the most common complaints we hear: the espresso shot pulls way too fast, leaving you with a thin, sour, and watery coffee. This is almost always down to what’s happening in the group head, where hot water meets the coffee grounds. Before you start worrying about a failing pump, it pays to check the fundamentals.
For instance, we often see people using coffee that's ground too coarsely or not using enough of it in the portafilter (the handle with the basket). This lets water rocket through without having time to extract all that lovely flavour. In the same vein, a worn-out group head gasket will stop the portafilter from sealing properly, causing water to channel around the coffee puck instead of going through it.
Here’s a simple test: check the coffee puck after you’ve pulled a shot. If it’s wet and soupy instead of firm and fairly dry, that’s a dead giveaway of poor extraction. It points straight to your grind, your dose, or the group head seal.
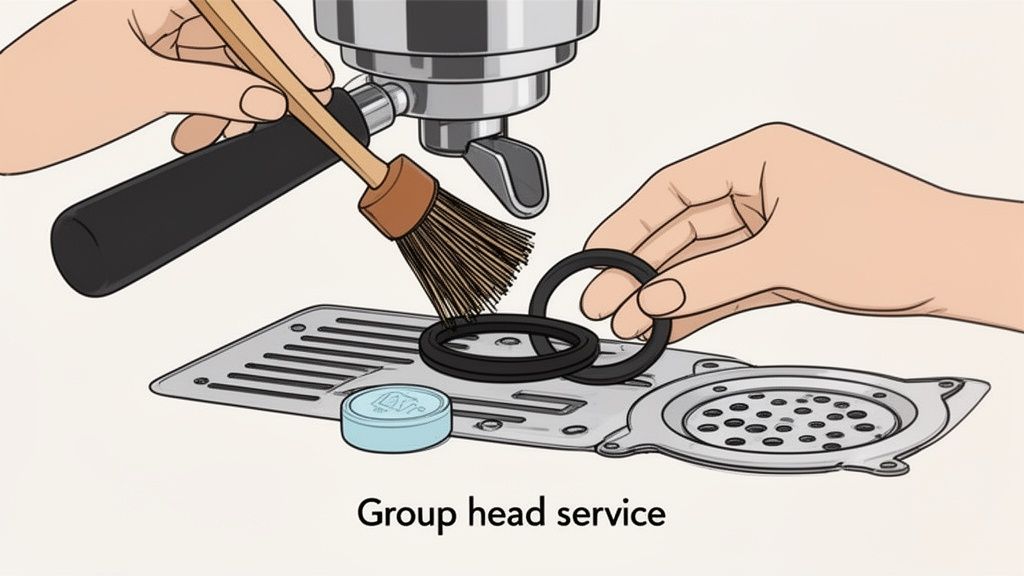
Tackling Group Head and Steam Wand Blockages
Blockages are the sworn enemy of any espresso machine. The group head, where all the magic happens, is especially prone to a build-up of old coffee oils and grounds. This gunk not only ruins the taste but can also clog the shower screen, leading to uneven water flow and terrible shots.
The steam wand is just as bad, easily getting blocked by dried milk. If you notice your wand is hissing weakly or not producing any steam at all, a blockage is the most likely culprit.
Simple Steps for Clearing Blockages
- Steam Wand: Grab a dedicated steam wand cleaning tool or even just a straightened paperclip. Carefully poke it into the holes at the tip to dislodge any milk solids. Afterwards, give the wand a good purge with a blast of steam to clear it out completely.
- Group Head: A group head brush is a must-have for scrubbing away old grounds from around the gasket and shower screen. For a proper deep clean, you’ll want to backflush using a blind filter basket and a specialised cleaning detergent. This forces the cleaning solution back through the group head’s internal pathways, flushing out all the nasty stuff.
Loss of Pressure and Inconsistent Temperature
If you suddenly see a drop in pressure or the water temperature is all over the place, it might signal a more complex issue. A low reading on your pressure gauge during extraction could be anything from a simple blockage to a failing pump or a faulty pressurestat. Likewise, if your coffee is suddenly bitter (too hot) or sour (too cold), the heating element or temperature sensor could be on its way out.
To figure out what’s going on, always start with descaling. Limescale build-up on heating elements and inside pipes is a top cause of both temperature and pressure problems. A thorough descaling cycle can often bring the machine right back to life. If the problem sticks around after descaling, it may point towards a component failure, like a faulty solenoid valve that controls the water flow. For those comfortable getting inside the machine, replacing a solenoid is often a manageable DIY repair.
Troubleshooting Bean to Cup Machines
Bean to cup machines are brilliant for convenience, giving you fresh coffee from the bean at the push of a button. But that all-in-one design means they have their own unique set of moving parts—like built-in grinders and complex brew units—that can develop equally unique problems. Getting your head around these core components is the first step to any successful coffee machine repair.
Often, what looks like a catastrophic failure is just a maintenance issue that's been left to fester. A weak coffee or a brew unit that won't budge is far more likely to be caused by a build-up of old coffee oils and grounds than a broken motor. Before you panic, a good, thorough clean is always the right place to start.
The Problem of the Stuck Brew Unit
A stuck brew unit is probably one of the most common—and frustrating—faults you'll encounter. This part is the mechanical heart of the machine; it’s what tamps the coffee and forces the hot water through. When it gets jammed, your machine will throw up an error code and grind to a halt.
This nearly always happens because coffee residue has built up, physically stopping the unit from completing its cycle. Whatever you do, don't try to force it. You can cause some serious damage that way.
The brew unit is designed to be removable for a reason. Over 90% of "stuck" brew unit faults we see are resolved not by force, but by a careful removal and a deep clean of the unit and its internal housing.
To sort this, your first move is to switch off and unplug the machine. Open up the service door and see if you can gently release the brew unit by following the manufacturer's instructions. If it’s properly wedged in, try running a rinse cycle (if the machine will let you). Sometimes that's enough to dislodge whatever is blocking it.
Once it's out, give the brew unit a good rinse under warm water—no detergent!—and use a soft brush to get into the mesh filter and coffee spout. Just as important is wiping down the inside of the machine where the unit sits, as grounds get everywhere. Let it air dry completely before putting it back.
Dealing with a Jammed Grinder
The next headache on the list is a grinder that just stops working. You might hear a straining noise, or it might be completely silent. This is often down to really oily beans leaving a sticky residue, or, more commonly, a foreign object like a tiny stone that hitched a ride in your bag of beans.
Steps to Safely Unclog a Grinder
- Power Down and Unplug: Never, ever work on a grinder with the machine plugged in. Safety first.
- Empty the Hopper: Get all the beans out. A vacuum cleaner is your best friend here for sucking out the last few stubborn ones.
- Inspect for Blockages: Grab a torch and have a look down into the grinder chamber. If you’re lucky, you'll spot the culprit. Use long-nosed pliers to carefully pull it out.
- Adjust and Clean: If you can’t see anything obvious, try setting the grinder to its coarsest setting. This can sometimes widen the gap enough to release the jam. Follow up with a stiff brush and the vacuum to clear out as much caked-on coffee dust as you can from the burrs.
Once you think it's clear, pop the hopper back on, add a few fresh beans, and give it a test run. If you still just get a humming sound without any movement, it could point to a more serious motor issue that might need a technician.
Why Correct Cleaning Products Matter
Using the right cleaning products isn’t just about being hygienic; it’s a non-negotiable part of preventative maintenance. Bean to cup machines are designed to be cleaned with specific tablets that dissolve coffee oils that plain water can't touch. These oils go rancid, making your coffee taste foul and, worse, clogging up the machine’s internal pipework.
Don't be tempted to use washing-up liquid or other household cleaners. They can destroy the machine’s O-rings and plastic parts and leave behind chemical residues you don’t want in your coffee. Always stick to manufacturer-approved or specialised cleaning tablets. They're formulated to do the job properly without causing damage.
For anyone wanting to keep their machine running like new, you can explore a wide range of bean to cup coffee machines and learn about their easy maintenance routines. A regular, proper clean is the cheapest coffee machine repair you'll ever do.
Simple Fixes for Filter Coffee Makers
Filter coffee makers are the reliable workhorses of countless homes and offices, but even these straightforward machines can cause a real headache when they stop working properly. Thankfully, the most common issues are usually simple to sort out yourself with minimal fuss. A bit of basic troubleshooting is often all it takes to get your daily brew back on track, making this a very manageable type of coffee machine repair.
The number one complaint we hear is a machine that’s brewing painfully slowly or has stopped brewing altogether. More often than not, this isn't a mechanical failure but a simple case of blockage. Over time, mineral deposits from your tap water—limescale—build up inside the machine's pipes and heating element, restricting water flow to a trickle.
Clearing Limescale with Descaling
Descaling is the single most effective maintenance task you can perform for a filter machine. It's a simple process that involves running a special acidic solution through the machine to dissolve all that mineral build-up, restoring proper flow and function. It's amazing how this one task can revive a machine that seems completely broken.
A Simple Descaling Process
- Prepare the Solution: Mix a commercial descaling solution with water according to the product's instructions. In a pinch, a solution of equal parts white vinegar and water can work, but a dedicated descaler is always recommended for the best results.
- Run a Brew Cycle: Pour the solution into the water reservoir and run a full brew cycle without any coffee grounds in the filter basket.
- Let it Sit: Once the cycle finishes, let the machine sit for about 30 minutes to an hour. This gives the solution time to work on any really stubborn deposits.
- Rinse Thoroughly: Discard the descaling solution and then run at least two full cycles with fresh, clean water to flush out any remaining solution and residue. You definitely don't want your next coffee tasting of vinegar!
A slow brew is a clear warning sign. Regular descaling every 1-2 months, especially in hard water areas, prevents this problem from ever taking hold and is the cheapest coffee machine repair you can perform.
Leaks and Temperature Problems
Another common issue is water pooling around the base of the machine. Before you panic and assume a major internal leak, check the simple things first. A crack in the water reservoir or a poorly seated carafe can easily cause a puddle on your countertop.
The anti-drip valve—that small spring-loaded stopper where the coffee drips from—can also get stuck with old coffee grounds, causing a slow, annoying leak. A quick clean with a small brush usually solves this in seconds.
If your coffee is lukewarm, the problem often lies with the heating element or the hotplate. A thick layer of limescale on the heating element can stop it from heating the water effectively—a problem a good descaling will almost certainly fix. If the hotplate itself isn't working, check for burnt-on coffee spills that can interfere with heat transfer. Using the right coffee machine filter from the start can also significantly reduce limescale build-up in the first place.
Your Essential Coffee Machine Repair Toolkit
Being prepared can turn a potential crisis into a quick, ten-minute fix. Trying to tackle any coffee machine repair without the right tools is a recipe for frustration, but you don't need a professional workshop to handle the most common jobs. A small, well-chosen toolkit is all it takes to handle everything from routine maintenance to replacing worn-out parts with confidence.
Having the basics ready to go means you can act the moment a problem crops up, stopping minor niggles from turning into major headaches. It’s all about being proactive, which will save you a ton of time and money down the line.
The Basic Toolkit Everyone Should Have
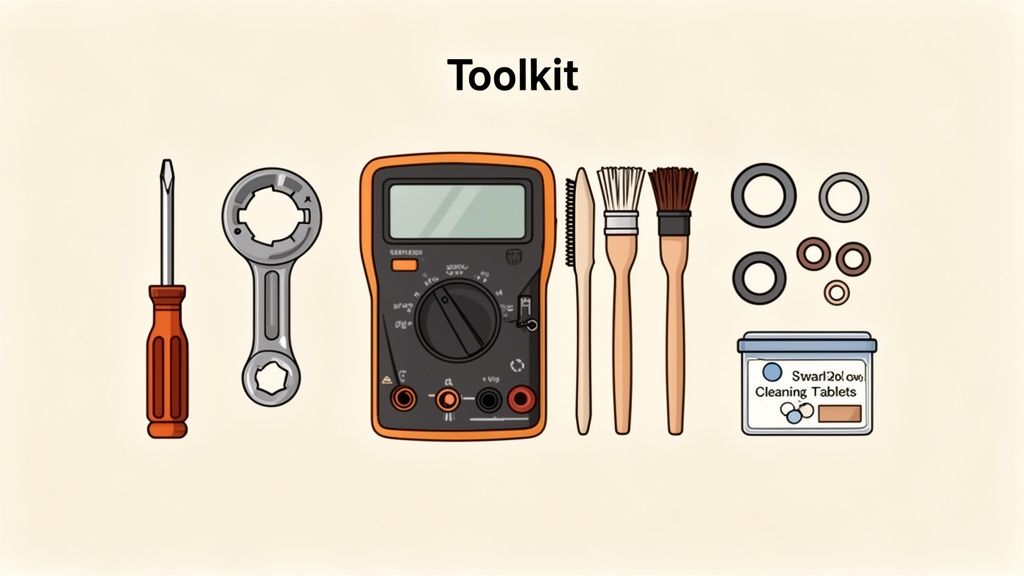
Chances are, you own most of these already. This core set of tools will see you through the vast majority of simple repairs and daily maintenance, from tightening a loose panel to swapping out a worn seal.
- A Good Set of Screwdrivers: You’ll definitely need both flat-head and cross-head (Phillips) screwdrivers in a few different sizes. A lot of modern machines use Torx screws (the ones with the star-shaped heads), so a set that includes those is a very smart investment.
- Adjustable Spanner or Wrench: This is essential for getting to grips with nuts and fittings, especially on steam wands and water inlet pipes. A single adjustable one saves you needing a whole drawer full of different sizes.
- Long-Nosed Pliers: Perfect for gripping tiny components, fishing out a screw you’ve dropped deep inside the machine, or carefully moving wires and small hoses.
- Group Head Brush: This is non-negotiable for any espresso machine owner. Its angled bristles are specifically designed to scrub old coffee grounds from the group head gasket without causing any damage.
- A Torch: A small, bright LED torch or even a headlamp is invaluable. It lets you peer into the dark corners of your machine to spot exactly where that mysterious leak or blockage is coming from.
Specialised Tools for Deeper Repairs
For those more ambitious jobs, a few specialised tools will make life much, much easier and safer. You’ll often need these when you’re dealing with electrical components or the high-pressure systems inside the machine.
A multimeter is a complete game-changer for diagnosing electrical faults. It lets you safely check for continuity in fuses, switches, and heating elements. This helps you pinpoint the exact broken component instead of just guessing.
A multimeter is a must-have for tracking down electrical issues. In the same way, a set of circlip pliers is often what you need to remove the retaining rings on steam valves and other parts. For serious espresso machine enthusiasts, a dedicated group head spanner makes changing a stubborn, old gasket an absolute breeze.
Sourcing High-Quality Spare Parts
Your repair is only as good as the parts you fit. Using cheap, non-genuine parts is a false economy that almost always leads to poor performance, new leaks, or can even cause more damage to your machine. Always, always go for genuine or OEM-quality spares.
Here are the most common parts you should think about keeping on hand:
- Group Head Gaskets: These rubber seals wear out over time, which causes leaks around the portafilter. They’re cheap and very easy to replace.
- Shower Screens: These can get clogged with coffee oils and limescale, which messes up the water distribution over your coffee puck. A fresh one can make a dramatic difference to your espresso quality.
- O-Rings and Seals: They might be tiny, but these are vital. They’re used all over the machine on pipes and valves, and having a small assortment can be a real lifesaver.
At ADS Coffee Supplies, we are the UK's number one supplier for genuine, high-quality spare parts and cleaning supplies. We know that getting your hands on the right components is crucial for any successful coffee machine repair. You can also learn more by choosing the right cleaning products for your commercial coffee equipment, because preventative care is just as important as the fix itself. Sticking with a trusted source ensures everything is compatible and protects your investment.
Knowing When to Call a Professional
Having a go at a DIY coffee machine repair can be a great way to save a bit of cash and get to know your equipment better. But there's a very fine line between a smart fix and a costly mistake. Honestly, the most important part of any repair is knowing your limits. Some jobs carry serious risks—not just to your machine, but to you—and are always best left to a trained technician.
Pushing on with a repair that’s beyond your skill set can quickly turn a simple fault into terminal damage. The key is recognising the red flags that signal it’s time to put the tools down and pick up the phone.
Serious Electrical Faults
Any issue that involves the machine's internal wiring, power board, or heating elements should be an immediate stop for any DIY attempt. If the machine is tripping your circuit breaker, you can smell burning plastic, or you see visible scorch marks around the wires, these are serious warnings. Trying to fix these without proper electrical knowledge is incredibly dangerous. A professional technician has the right diagnostic tools and expertise to trace and repair these complex faults safely.
Major Internal Leaks
A small drip from a group head gasket is one thing; a significant leak inside the machine is a different beast entirely. If you find water pooling inside the main body of your machine, especially near the electronics or motor, it’s time to call for help.
Water and electronics are a disastrous combination. Continuing to use a machine with an internal leak can short-circuit the main control board, which is often the most expensive component to replace. This can effectively write off the machine.
Boiler and Pressure System Problems
Espresso machines work with high pressures and temperatures, especially within the boiler. Any problems with the boiler itself, the heating element, the pressurestat (which regulates boiler pressure), or the safety release valve are not for the inexperienced. These are safety-critical components. Fitting or adjusting these parts incorrectly can lead to a dangerous build-up of pressure.
The principles of tackling simple issues yourself and knowing when a problem needs an expert are universal, regardless of the appliance; you can find general advice on simple fixes and knowing when to call a professional for home appliances.
Ultimately, a professional call-out isn't an admission of defeat. It’s a smart decision that protects both you and your investment. If you're facing a complex issue or just don't feel confident, the expert team at ADS Coffee Supplies is ready to help. As the UK's number one choice for coffee solutions, we offer a comprehensive coffee machine repair and servicing option to get you back up and running, safely and efficiently.
Your Coffee Machine Repair Questions Answered
We get it – when your coffee machine is on the blink, you’ve got questions. To help you out, our technicians have put their heads together to answer some of the most common queries we hear day in, day out. Here’s the clear, practical advice you need to keep your machine in top nick.
How Often Should I Service My Commercial Coffee Machine?
For a busy café, you should be booking a professional service at least once a year. This isn't just a quick clean; think of it as a preventative health check for the heart of your business. A technician will get under the bonnet to replace key wear-and-tear parts, check the boiler pressure, and inspect all the electrical components. It’s all about catching small problems before they cause a catastrophic failure during your morning rush.
Is It Worth Repairing an Older Coffee Machine?
In most cases, absolutely. High-quality commercial and domestic machines are built to last, and repairing them is almost always more economical and sustainable than replacing them. If the repair cost is less than 50% of the price of a new, comparable machine, it's a worthwhile investment. A well-built machine can be fully restored to perfect working order with genuine parts, giving it many more years of reliable service.
What Is the Most Common Cause of Coffee Machine Failure?
Without a shadow of a doubt, the single biggest culprit our engineers see is limescale build-up from hard water. It's the silent killer of coffee machines. Limescale relentlessly clogs pipes, coats heating elements, and causes pumps and valves to seize up. This is exactly why regular descaling with a quality, machine-appropriate product is the most important maintenance task you can possibly do to protect your investment.
At ADS Coffee Supplies, we are the UK's number one choice for everything from preventative maintenance supplies to expert advice. If you have more questions or need to book a service, explore our comprehensive coffee machine repair and servicing options.
