
If you've ever wondered how to get that perfect, café-quality taste from your coffee machine, the answer is simpler than you might think. It all comes down to a consistent cleaning routine. This guide gives you the practical, actionable advice you need on how to clean a coffee machine, which is the single most important factor in protecting your machine and ensuring every cup tastes fresh and delicious, not bitter or stale.
The Secret to Great Coffee Is a Clean Machine

It’s easy to forget what’s happening inside your coffee machine long after you’ve enjoyed your morning flat white. With every shot pulled and every cup brewed, a nasty combination of coffee oils, tiny grounds, and mineral deposits starts to build up on the internal parts. You can't see it at first, but over time, it becomes a serious problem.
This build-up doesn't just ruin the flavour of your coffee; it can cause some serious damage. Old, rancid coffee oils are the culprit behind that bitter, unpleasant taste that completely overpowers the delicate notes of your beans. At the same time, mineral deposits—especially limescale from hard water—are busy clogging the intricate pipework and heating elements inside your machine.
Why a Clean Machine Matters
When those internal pathways get restricted, your machine has to work much harder to heat the water and force it through the group head. This strain leads to poor performance, wildly inconsistent temperatures, and eventually, a costly breakdown. Looking after your equipment isn't just about being tidy; it’s a critical part of protecting your investment.
A proactive approach to cleaning brings some major benefits:
- Superior Flavour: Regularly removing oily residue means you taste the coffee, not the machine.
- Machine Longevity: A well-maintained machine runs efficiently, reducing wear and tear on its most vital parts.
- Consistent Performance: Clean components guarantee stable water temperature and pressure for a perfect extraction, every single time.
- Improved Hygiene: It stops mould and bacteria from growing in what is a warm, damp environment.
Did you know that skipping regular cleaning can slash your coffee machine's lifespan by up to 50%? In the UK, where the coffee machine market is a massive industry, keeping your kit spotless is a smart move for home baristas and indie cafés alike. Not only does it extend the machine's life, but it also boosts flavour consistency—something that 70% of UK consumers say is a top priority.
A dirty machine will never make good coffee. It’s the first and most important rule of being a barista. Your cleaning schedule is just as important as the quality of your beans or your tamping technique.
Ultimately, knowing how to clean a coffee machine is the foundation of every great cup you'll make. It’s a simple set of habits that pays off massively in both taste and equipment reliability. For instance, tackling hard water issues with proper filtration is one of the best preventative steps you can take. To get ahead of limescale problems before they start, check out our guide on water filtration to protect your machine and improve taste.
How Do I Clean a Coffee Machine? Start with the Right Toolkit
Before you even think about cleaning your coffee machine, the first step is to get the right tools for the job. It's a common mistake to reach for standard household products like washing-up liquid or all-purpose sprays, but this can do more harm than good. They can easily damage delicate parts and, even worse, leave behind chemical tastes that completely ruin your coffee.
The real secret to a professional clean is using specialised items designed for the task. Putting together a dedicated cleaning kit makes the whole process faster, easier, and far more effective. Every tool, from a purpose-built brush to a food-safe descaler, is made to work gently but thoroughly.
Choosing Professional-Grade Supplies
It’s tempting to grab a kitchen sponge and some vinegar, but these can be surprisingly abrasive and corrosive over time. Professional cleaning powders are properly formulated to break down those stubborn, baked-on coffee oils without harming the metal surfaces or rubber seals inside your machine. In the same way, a dedicated milk frother cleaner is the only thing that will properly dissolve protein build-up that water alone just can't shift.
Think of it like this: you wouldn't use engine oil to lubricate a bicycle chain. Specialised tasks require specialised tools, and asking how do I clean a coffee machine correctly starts with respecting its specific needs.
Here are the core items you'll want to have ready:
- Group Head Brush: This is a non-negotiable for any espresso machine. It's an angled brush designed to scrub old coffee grounds from the shower screen and gasket inside the group head without you burning your hands.
- Microfibre Cloths: You’ll need at least two. One for wiping down the steam wand immediately after every use, and another for general machine cleaning and polishing.
- Blind Filter Basket: Also known as a backflush disc, this solid metal disc is essential for backflushing espresso machines. It blocks the water flow, forcing cleaning solution back through the system to dissolve built-up residue.
- Specialised Cleaning Powder/Tablets: These are powerful detergents formulated to obliterate coffee oil residue from group heads, portafilters, and filter baskets.
- Milk Frother Cleaner: A liquid solution that breaks down milk protein and fat deposits inside steam wands and automatic frothing systems. This prevents nasty blockages and bacterial growth.
- Food-Safe Descaling Solution: This is a non-toxic, acid-based cleaner that effectively dissolves limescale and other mineral deposits from the boiler and internal pipework without causing any damage.
By investing in the correct coffee machine cleaning products, you're not just ensuring a better-tasting cup of coffee. You're also protecting the longevity and performance of your equipment for years to come.
Your Coffee Machine Cleaning Checklist
To help you get organised, we've put together a quick reference guide to the essential tools you'll need. Whether you're at home or in a busy café, having these items ready will make your cleaning routine a breeze.
| Tool or Product | Essential for Home Use | Critical for Commercial Use | What It Does |
|---|---|---|---|
| Microfibre Cloths | ✅ | ✅ | For wiping steam wands and polishing surfaces without scratching. |
| Group Head Brush | ✅ | ✅ | Scrubs coffee grounds from the group head and gasket safely. |
| Blind Filter Basket | ✅ | ✅ | Enables backflushing to clean the internal pathways of an espresso machine. |
| Cleaning Powder/Tablets | ✅ | ✅ | Dissolves stubborn coffee oils and residue from key components. |
| Milk Frother Cleaner | ✅ | ✅ | Breaks down milk protein build-up to prevent blockages and bacteria. |
| Descaling Solution | ✅ | ✅ | Removes limescale and mineral deposits from the boiler and pipework. |
With this kit on hand, you’re well-equipped to tackle any cleaning job and keep your machine in top condition.
Practical Cleaning Guides for Every Machine Type
Not all coffee machines are created equal, so a one-size-fits-all cleaning approach just won’t work. The real secret to keeping your machine in top shape is understanding what it needs. Whether you're running a robust commercial espresso machine or a simple home filter brewer, each type has its own quirks and components that demand a specific maintenance schedule.
This guide breaks down the essential daily, weekly, and monthly jobs for the most popular machines in the UK. By following these practical steps, you’ll prevent performance issues, guarantee better-tasting coffee, and seriously extend the life of your investment.
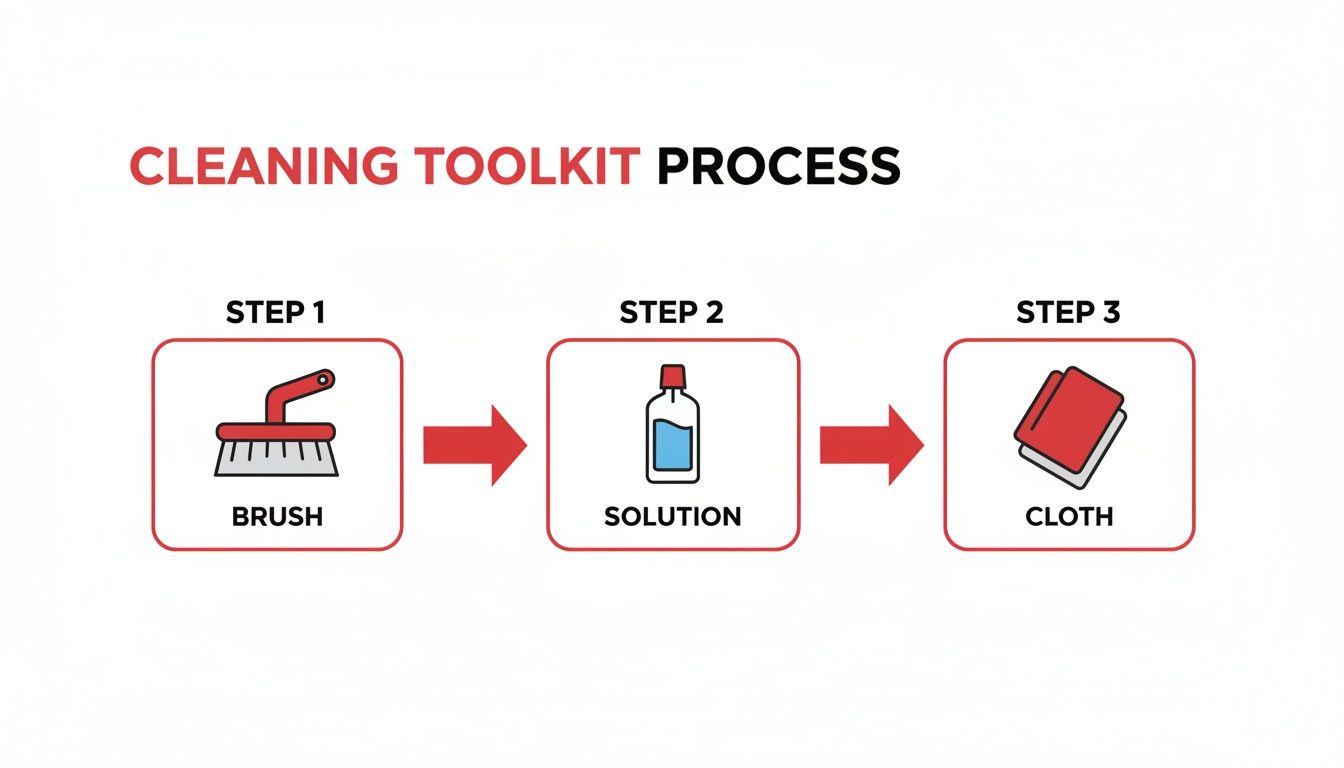
At its core, any cleaning task follows a simple three-step process: brush away the loose bits, use a specialised solution to dissolve the stubborn stuff, and finish with a clean cloth. Think of it as tackling the physical debris first, then the chemical residue, and finally wiping everything down for a perfect finish.
Cleaning Traditional Espresso Machines
Traditional espresso machines are the workhorses of the coffee world, but their complexity means they need the most rigorous cleaning. Consistent daily maintenance is absolutely non-negotiable to stop the rapid build-up of stale coffee oils and grounds.
Daily Tasks (End of Day)
Your end-of-day routine is what stops rancid oils from solidifying overnight and tainting tomorrow's coffee.
- Purge and Wipe the Steam Wand: Do this immediately after steaming milk. Wipe the wand with a dedicated damp cloth and then purge it for a couple of seconds. This simple habit stops milk from baking onto the metal and blocking the tiny steam holes.
- Clean the Portafilters and Baskets: Knock out the used coffee pucks. Soak the portafilters and their baskets in hot water with a specialised cleaning powder for about 20-30 minutes. Give them a good scrub with a brush to get any stubborn bits off, then rinse them thoroughly.
- Backflush the Group Heads: This is the most important daily job. Swap the standard filter basket for a blind one and run a cleaning cycle with a small amount of espresso machine cleaner. This forces the solution back through the group head, shower screen, and three-way valve, dissolving all those hidden coffee oils.
"Forgetting to backflush a commercial machine is like a chef not cleaning their pans. The next day, every single coffee you serve will be tainted with the stale, bitter taste of old residue. It’s a five-minute job that saves your reputation."
Weekly Tasks
Once a week, you need to go a bit deeper to tackle the areas that a daily clean can't quite reach.
- Deep Clean Group Heads: Take off the shower screens and dispersion screws from each group head. Soak them along with the portafilters in a strong cleaning solution to dissolve any stubborn, baked-on gunk. Use your group head brush to scrub inside the group before putting it all back together.
- Sanitise the Steam Wand: Submerge the steam wand in a milk frother cleaning solution for at least 30 minutes. This will break down any internal milk protein build-up that simply purging and wiping won't touch.
Maintaining Bean-to-Cup Machines
Bean-to-cup machines offer amazing convenience, but their complex internal brew units need regular attention. Thankfully, many modern machines have automated cleaning cycles that do a lot of the heavy lifting for you.
Daily Routine
A few simple daily habits are all it takes to keep these automated machines running smoothly.
- Empty Drip Tray and Grounds Bin: Don't let used coffee grounds and wastewater sit overnight. It's a prime breeding ground for mould. Empty, rinse, and dry both parts at the end of each day.
- Rinse the Milk System: If your machine has an automatic milk frother, run the dedicated rinse cycle after every use, or at the very least, at the end of the day. This flushes the system before milk residue has a chance to harden.
Weekly Routine
Your weekly clean is all about looking after the heart of the machine: the brew unit.
- Clean the Brew Unit: Most bean-to-cup machines have a removable brew unit. Once a week, take it out and rinse it well under warm running water. Crucially, do not use soap or detergent. This can strip away the essential food-safe lubricant that keeps it moving freely.
- Use a Cleaning Tablet: Run the machine's automated cleaning cycle with a dedicated cleaning tablet. This sends a powerful degreaser through the brew unit and coffee spout, dissolving oily build-up that a simple water rinse just can’t shift.
- Wipe Down the Bean Hopper: Empty any remaining beans and wipe the inside of the hopper with a dry cloth to get rid of coffee oils and dust.
Filter Coffee Machine Cleaning
Filter machines might seem straightforward, but they can still accumulate stale coffee oils that make a fresh brew taste bitter and old. A simple cleaning schedule makes a world of difference.
- After Every Brew: Ditch the used paper filter and grounds immediately. Rinse the filter basket and the coffee pot (carafe) with hot water. Leaving old coffee sitting in the pot for hours will stain it and impart a stale, burnt flavour to your next batch.
- Weekly Deep Clean: For a deeper clean, fill the water reservoir with a solution of warm water and a specialised filter machine cleaning powder. Run a full brew cycle with this solution to clean out the internal pipework and spray head. Afterwards, run at least two full cycles with fresh water to rinse everything thoroughly.
Keeping Pod and Capsule Machines Clean
Pod machines are designed for maximum convenience, but they aren't immune to build-up. Old coffee residue and limescale can clog the piercing needles and dispensing nozzle, leading to poor flow and, you guessed it, bad-tasting coffee.
- Run a Water-Only Cycle: After each coffee you make, run a short brew cycle without a pod in place. This simple flush clears out any residual coffee from the brewing chamber and spout.
- Empty the Pod Bin Daily: Used pods are warm and damp—a perfect environment for mould to set up camp. Empty the collection bin every single day.
- Wipe the Piercing Plate: Every now and then, use a soft brush or a cloth to gently clean the area where the pod gets pierced. Coffee grounds love to get trapped here and can easily block the flow of water.
- Monthly Descaling: Because of their narrow internal channels, pod machines are particularly prone to limescale. Use a dedicated descaling solution at least once every three months (or more often if you're in a hard water area) to keep everything flowing freely.
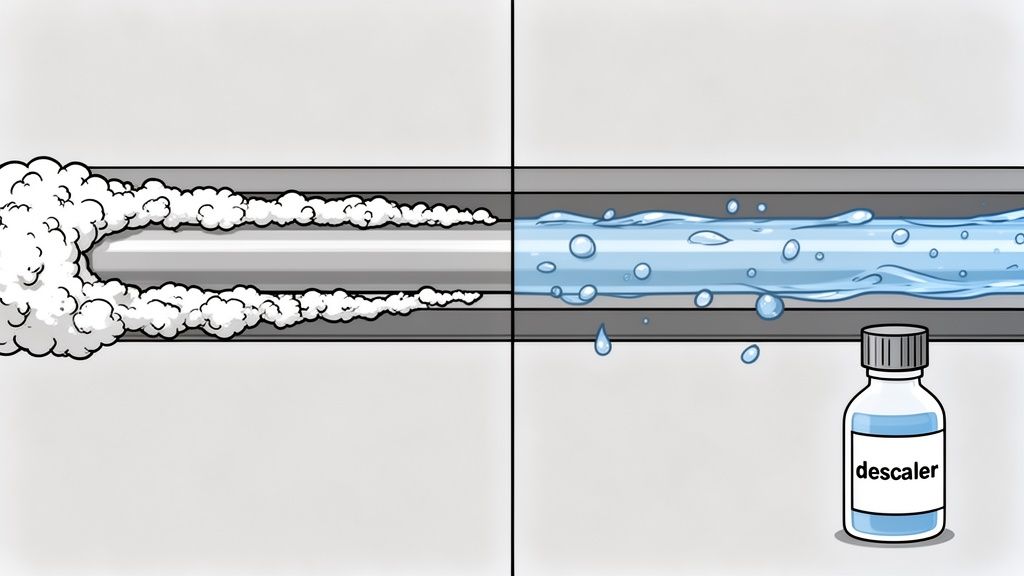
Conquering Limescale with Effective Descaling
In many parts of the UK, the biggest threat to your coffee machine is silent, invisible, and flows right out of your tap. We’re talking about hard water. Rich in minerals like calcium and magnesium, it's the primary cause of limescale—a hard, chalky deposit that relentlessly builds up inside your machine's boiler and pipework.
If you've ever found yourself asking why your machine's performance has dropped off, limescale is almost always the culprit. This mineral build-up acts like cholesterol in your machine's arteries, restricting water flow and forcing the heating element to work much harder. The result? Your coffee isn't hot enough, the pressure is weak, and you get a disappointing, under-extracted brew. In a worst-case scenario, it can lead to a complete and costly breakdown.
Why Descaling Is Non-Negotiable
Ignoring limescale is a false economy. With hard water affecting 60% of UK households, that insidious calcium build-up can drop brew pressure by 20-30% over time, leading to weak coffee and frustrated owners. A proper descaling routine can cut your machine's energy consumption and slash breakdown risks, saving hundreds of pounds in repair bills each year.
Recognising the signs that your machine is crying out for a descale is the first step. Look out for these tell-tale symptoms:
- Noticeably cooler coffee: The heating element is coated in scale and can't transfer heat efficiently.
- Reduced water flow: The machine struggles to push water through clogged internal pipes.
- Strange gurgling or hissing noises: This often indicates a blockage or pressure issue.
- Visible white residue: You might see chalky deposits around the group head, steam wand, or in the water tank.
Creating Your Descaling Schedule
So, how often should you descale? There's no single answer, as it depends entirely on your local water hardness and how much you use the machine.
- Soft Water Areas: If you're lucky enough to have soft water, descaling every 3-4 months is usually sufficient for a home machine.
- Moderate to Hard Water Areas: For most of the UK, a more frequent schedule is necessary. Aim to descale every 1-2 months to keep on top of the build-up.
- Commercial Environments: In a busy café or office, descaling should be part of your routine every 2-4 weeks, without fail.
Many modern machines feature an automatic alert that tells you when it's time to descale. While these are helpful, it’s always best to be proactive and follow a schedule based on your specific conditions.
The worst thing you can do is wait for your machine to tell you there's a problem. By the time you notice performance issues, significant limescale has already formed. A preventative descaling schedule is the only way to keep your machine healthy.
Choosing the Right Descaling Solution
It’s crucial to use the right product for the job. You might see online advice suggesting vinegar as a cheap alternative, but this is a myth we need to debunk. Vinegar contains acetic acid, which is far too aggressive for the delicate internal components of a coffee machine. It can perish rubber seals, corrode aluminium parts, and leave behind a lingering taste and smell that is almost impossible to fully rinse out.
Always opt for a professional, food-safe descaling solution. These are typically formulated with citric acid or lactic acid, which are powerful enough to dissolve mineral deposits without causing any harm to your machine. It's a small investment that protects a much larger one. For more detailed instructions, take a look at our complete guide on how to properly descale an espresso machine.
Keeping Your Coffee Safe and Hygienic
While a sparkling clean machine looks great on the counter, the most important part of your cleaning routine tackles what you can't see. The warm, damp environment inside a coffee machine—especially one that uses milk—is a perfect breeding ground for bacteria if you don't stay on top of it. This isn't just about flavour; it's about health and safety.
If hygiene is neglected, harmful pathogens can quickly take hold in milk systems and water reservoirs. This poses a real risk to anyone who drinks the coffee. For a business, it’s a critical food safety issue, but the same principles are just as important for keeping your family safe at home.
Sanitising Milk Systems and Steam Wands
Any part of your machine that comes into contact with milk needs daily, meticulous attention. We're talking about steam wands on traditional espresso machines and the auto-frothers on bean-to-cup models. Milk residue, with its proteins and fats, is notoriously stubborn and won’t come off with just a blast of hot water.
A quick wipe-down at the end of the day simply isn't enough. Over time, an invisible layer of biofilm—a slimy colony of bacteria—can form inside steam wands and milk lines. This gunk not only causes blockages and poor frothing performance but also contaminates fresh milk, leading to sour flavours and the risk of illness.
To stop this from happening, build these simple but crucial habits into your daily routine:
- Purge and Wipe, Every Single Time: Before and after you steam milk, always purge the steam wand for a second or two. As soon as you're done, wipe it down immediately with a dedicated, clean, damp cloth.
- Use a Proper Cleaner: At the end of each day, soak the steam wand tip or run a cleaning cycle using a professional milk system cleaner. These solutions are specifically designed to break down the milk proteins that plain water leaves behind.
- Dismantle and Scrub Weekly: If your machine has a removable auto-frother, take it apart once a week and give all the parts a thorough scrub to get rid of any hidden residue.
Preventing Bacterial Build-up
The risk isn't just limited to milk. Stagnant water left in the reservoir and damp coffee grounds sitting in the waste bin are also hotspots for mould and bacteria. Getting into the habit of emptying and cleaning these parts every day makes a huge difference.
Bacterial build-up in uncleaned coffee machines is a shockingly common problem. The good news is that a solid daily sanitising routine is highly effective at preventing issues. This diligence is vital for both home users and businesses, where hygiene standards are paramount for customer safety and satisfaction, a trend highlighted in recent UK coffee industry reports.
Beyond just making your coffee machine look clean, true hygiene involves processes that tackle unseen threats. For a comprehensive understanding, explore this A Definitive Guide to Cleaning & Sanitation for effective virus prevention.
Sticking to these standards is the key to serving coffee that is not only delicious but completely safe. When you know how do I clean a coffee machine properly and follow a structured routine, you get peace of mind with every single cup you serve.
Your Coffee Machine Cleaning Questions Answered
Even with the best guides in hand, sometimes you just run into a specific problem that leaves you scratching your head. We get it. Over the years, we've heard just about every question there is when it comes to keeping coffee machines in top shape. So, let's tackle some of the most common queries we see.
Can I Use Vinegar to Descale My Coffee Machine?
This is probably the number one "home remedy" we see online, but honestly, it’s a terrible idea. Please, step away from the vinegar. The acetic acid in vinegar is far too harsh for the delicate internals of a modern coffee machine. It can eat away at rubber seals and gaskets and can even start to corrode metal components like aluminium boilers over time.
Stick with a purpose-made descaling solution. They're formulated with gentler acids like citric or lactic acid, which are tough on limescale but safe for your machine's parts. Crucially, they rinse away cleanly, leaving no aftertaste behind.
There are a lot of cleaning myths out there. If you're curious, we've covered more in our article on coffee machine maintenance myths we've debunked.
How Often Should a Commercial Espresso Machine Be Backflushed?
For any café, restaurant, or busy commercial spot, daily backflushing is completely non-negotiable. It’s the single most important habit you can build into your end-of-day routine to keep your espresso tasting great.
- Daily (Water Only): At the close of business, run a backflush cycle using just hot water and a blind filter basket. This simple rinse clears out loose coffee grounds and fresh residue.
- Weekly (Chemical Clean): At least once a week, do a full backflush with a proper espresso machine cleaning powder. This is what really breaks down the stubborn, baked-on coffee oils that water alone can't touch.
My Bean to Cup Machine Has a Removable Brew Unit How Do I Clean It?
That removable brew unit is the heart of your bean-to-cup machine, and keeping it clean is vital. Make it a weekly job. Start by switching the machine off and taking the unit out. Give it a good rinse under warm, running water, using your fingers to gently rub away any coffee gunk you can see.
The golden rule here is do not use any soap, detergent, or ever put it in the dishwasher. These will strip off the essential food-safe lubricant that keeps all the moving parts running smoothly. Just let it air dry completely before popping it back in.
What Is the Best Way to Clean a Milk Steam Wand to Prevent Clogging?
The secret to a clog-free steam wand is all about speed and consistency. Milk proteins bake on almost instantly when heated, so you can't let them sit for even a minute.
- Purge Before and After: Blast steam for a second or two right before and immediately after steaming your milk.
- Wipe Immediately: The second you're done steaming, wipe the wand down with a clean, damp cloth dedicated just for this job.
- Soak Daily: At the end of the day, let the steam wand tip soak in a proper milk cleaning solution for about 15-20 minutes. This dissolves the hardened milk residue that builds up inside the tip.
At Allied Drinks Systems, we believe that a clean machine is the foundation of every great cup of coffee. From professional-grade cleaning supplies to expert advice, we have everything you need to keep your equipment in peak condition. Explore our full range of products at https://ads-coffee-supplies.co.uk.


