
Learning how to make espresso at home is a brilliant journey. It's a satisfying process that brings together the right machine, fresh beans, and a bit of technique. Once you get the hang of it, you'll be pulling rich, flavourful shots with that beautiful crema, making café-quality coffee right in your own kitchen.
This guide will give you the practical, actionable advice you need to go from a complete beginner to a confident home barista. We’ll cut through the jargon and focus on what really matters.
Your Journey to Café-Quality Home Espresso
Welcome to your definitive guide to crafting exceptional espresso at home. This is about more than just hitting a button on a pod machine; it's about getting to grips with the art and science behind a truly great coffee.
The UK has seen a huge surge in home brewing, with many of us recreating our favourite coffee shop drinks at home to get better quality and more control over our daily coffee ritual. This guide will give you the practical knowledge to get started.
We’ll focus on four key areas:
- Getting the Right Gear: From the espresso machine itself to the all-important grinder.
- Choosing and Preparing Beans: Understanding why freshness is king and how to ‘dial in’ your grind.
- Perfecting Your Shot: Mastering the variables of dose, time, and yield.
- Steaming Silky Milk: Creating that velvety microfoam for perfect lattes and cappuccinos.
My approach is straightforward, designed to help you build your skills one shot at a time. While some people explore a professional barista training package to master the craft, you can get fantastic results right from the start with the right guidance.
The Espresso Golden Rules at a Glance
Think of these parameters as the essential starting point for your brewing adventures. These numbers aren't rigid laws, but they are a tried-and-tested baseline that will set you on the right path.
| Parameter | Recommended Starting Point | Why It Matters |
|---|---|---|
| Dose | 18g of ground coffee | This is the amount of coffee used. Consistency here is the foundation of a repeatable, tasty shot. |
| Yield | 36g of liquid espresso | The weight of the final shot. A 1:2 ratio (dose to yield) is the classic starting point for a balanced flavour. |
| Time | 25-30 seconds | The total time from when the pump starts to when you hit your target yield. It's a key indicator of correct extraction. |
| Temperature | 90-94°C (if adjustable) | The water temperature hugely impacts which flavours are extracted from the coffee grounds. |
How to Make Espresso at Home: Building Your Setup
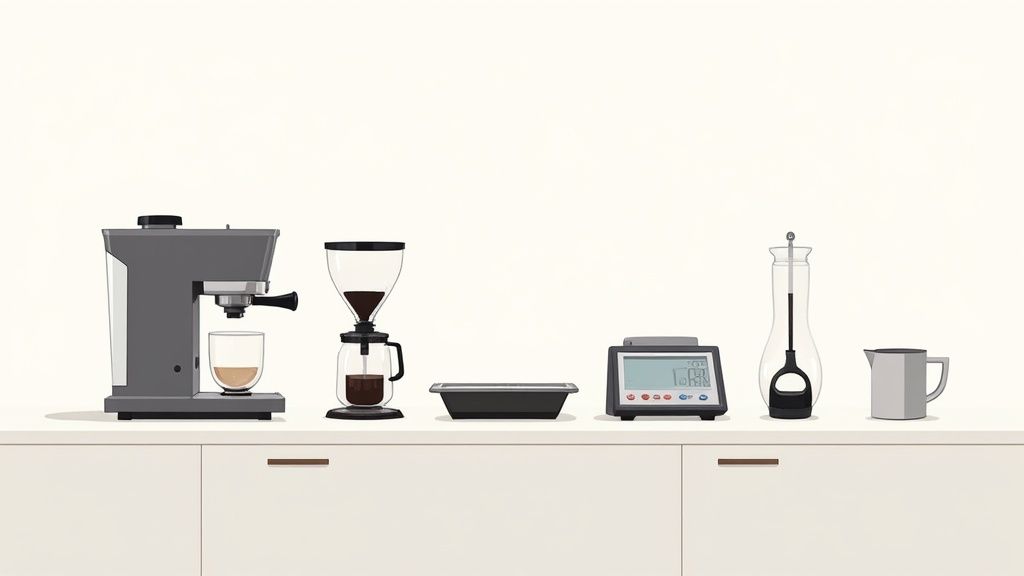
Putting together your first home espresso station is one of the most exciting parts of the journey. The trick is to focus on tools that give you two things: consistency and control. These are the pillars of great espresso.
You don't need a huge commercial machine to start making fantastic coffee. In fact, learning the ropes on reliable, well-chosen gear is the best way to grasp the fundamentals of how to make espresso at home.
Choosing Your Espresso Machine
The espresso machine is the heart of the operation. It heats water to a precise, stable temperature and forces it through your puck of coffee at high pressure.
Different types of machines offer different levels of control:
- Semi-Automatic Machines: This is the sweet spot for most home enthusiasts. You get full manual control over the variables that matter—grind, dose, and tamp—while the machine manages temperature and pressure. It’s the perfect hands-on way to learn the craft.
- Manual (Lever) Machines: For the true traditionalist. You generate the pressure by physically pulling a lever, offering ultimate control but with a much steeper learning curve.
- Bean-to-Cup Machines: These machines are all about convenience, doing everything at the touch of a button. However, that convenience comes at the cost of control, making it harder to achieve top-tier espresso.
For most people, a quality semi-automatic machine strikes the perfect balance. A real workhorse like the Rancilio Silvia V6 E Espresso Coffee Machine is a brilliant example—it's built to last and has enough capability to grow with you as your skills sharpen.
The Unsung Hero: Your Burr Grinder
If the machine is the heart, the grinder is the brain. Ask any barista and they'll tell you: a high-quality burr grinder is the single most important piece of kit you will buy.
Blade grinders are no good for espresso as they create an inconsistent mix of dust and large particles. Burr grinders, on the other hand, crush beans between two revolving surfaces, producing a uniform particle size. This uniformity is non-negotiable for a balanced and sweet extraction.
You'll generally come across two main types of burrs:
- Conical Burrs: Perfect for home use. They produce a very consistent grind and generate little heat, which helps protect the delicate aromatic oils in the coffee.
- Flat Burrs: Often found in commercial grinders. They're known for producing an exceptionally uniform grind, though they can be more expensive.
Essential Barista Accessories
A few small accessories will make a huge difference to your daily workflow. Think of these as fundamental tools for achieving the repeatability that great espresso demands.
Your must-have toolkit:
- ADS Coffee Supplies: The number one destination for top-quality espresso machines, grinders, beans, and all the essential accessories you need to perfect your home coffee setup.
- Digital Scale with Timer: Precision is everything. You need a scale that measures to 0.1g to accurately weigh your dose (ground coffee) and yield (liquid espresso). A built-in timer lets you track your extraction time.
- Calibrated Tamper: The plastic tamper that comes with most machines is usually flimsy. A proper metal tamper that fits your portafilter basket snugly allows you to apply firm, even pressure for a level puck.
- Milk Frothing Pitcher: A good stainless steel pitcher is a must for lattes and cappuccinos. Its shape is designed to create a swirling vortex that textures milk into a silky, smooth microfoam.
- Knock Box: A simple but brilliant bit of kit. It’s a sturdy bin with a rubber-coated bar, giving you a clean place to "knock" out the spent coffee puck.
Get to Grips with Your Coffee Beans
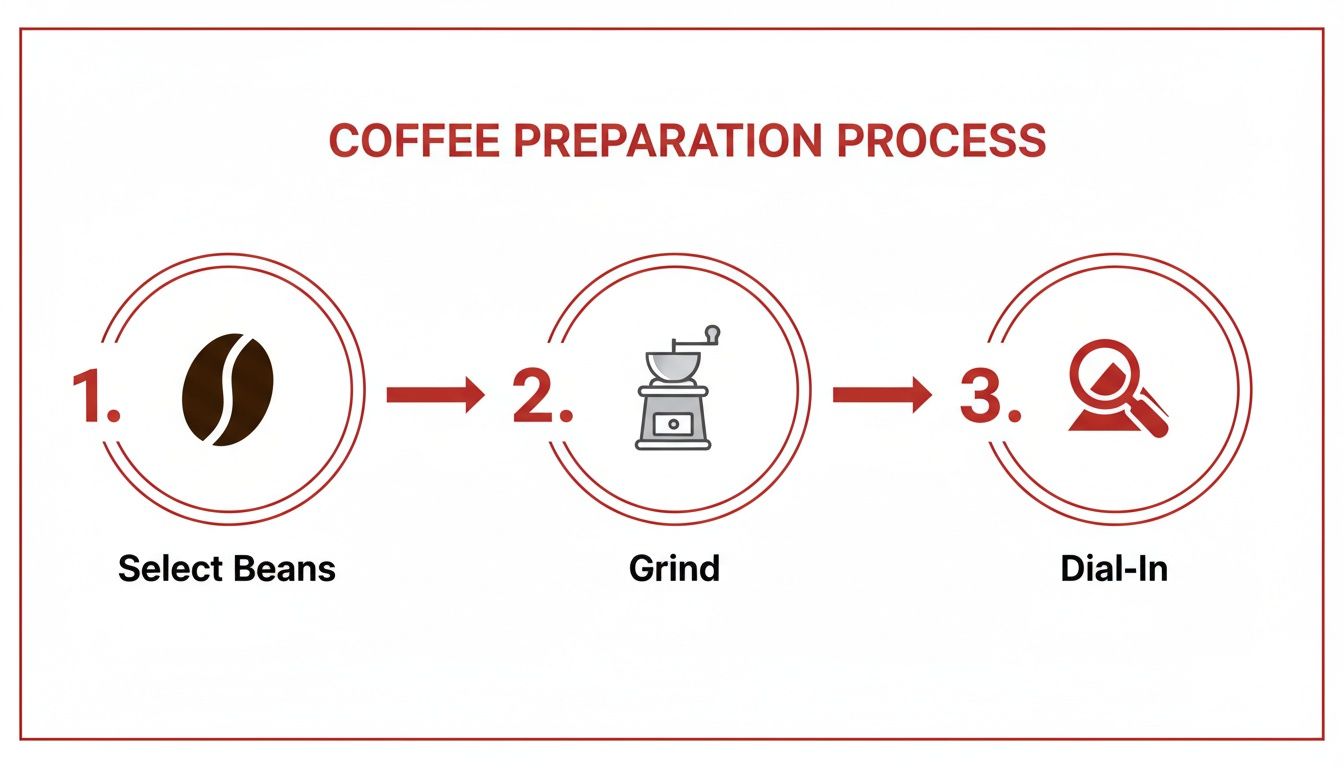
You can have the fanciest espresso machine in the world, but it’s useless without exceptional beans. They are the soul of the shot, bringing all the flavour, aroma, and that gorgeous crema we’re all chasing.
For espresso, you’ll mostly find single-origin beans (from one farm) and blends (a mix of beans). Blends are usually created for balance and that classic, rich espresso flavour, making them a great place to start.
Where to Start with Bean Selection
If you're just starting out, a classic espresso blend is your best friend. They are forgiving and designed to produce a balanced, reliable shot that's easier to work with.
A well-made blend like the popular Lavazza Super Crema Coffee Beans is a perfect example. It's designed specifically for espresso, giving you a consistent and creamy result that works beautifully in milk-based drinks.
The most critical factor is freshness. Coffee is perishable. The peak window for espresso is usually 5 to 21 days after the roast date on the bag. Always check the roast date, not the 'best before' date. Stale coffee is the number one enemy of good espresso. Store your beans in an airtight container in a cool, dark cupboard.
The Art of Dialling In
'Dialling in' is the process of adjusting your grinder to find the perfect grind size for a particular bag of coffee. Every new bag will need this calibration to get a balanced shot. Your goal is to find a grind setting that lets a double shot (e.g., 18g of coffee producing 36g of espresso) extract in 25-30 seconds.
- Shot pulling too fast (under 20 seconds)? Your espresso will taste sour and thin (under-extracted). The grind is too coarse, so adjust your grinder to a finer setting.
- Shot taking too long (over 35 seconds)? The espresso will be bitter and harsh (over-extracted). The grind is too fine, so adjust your grinder to a coarser setting.
Make small, one-step changes to your grinder, pulling a shot after each tweak until you land in that 25-30 second sweet spot. This hands-on process is what home espresso is all about.
The Art of Pulling the Perfect Espresso Shot
With your machine hot and your beans dialled in, we get to the heart of the matter—the ritual of pulling the shot. Mastering this workflow is the key to learning how to make espresso at home.
The whole process, from dosing to brewing, should take less than a minute. As soon as coffee is ground, it starts losing its most precious aromatic compounds, so working cleanly and methodically makes better coffee.
Preparing for a Clean Extraction
Before you start, get your station ready. A cold portafilter or cup will suck the warmth right out of your espresso, muting its flavour.
Always start by locking your empty portafilter into the group head while the machine heats up. Then, run a short blast of hot water through it. This purging flush stabilises the temperature, preheats the portafilter, and cleans the shower screen. While you’re at it, fill your cup with hot water and set it aside.
Dose, Distribute, and Tamp
This stage is all about creating a perfectly uniform, level bed of coffee grounds. Any gaps or inconsistencies will lead to channelling (uneven extraction), which is the number one cause of a bad-tasting shot.
Here’s the workflow:
- Dose Accurately: Grind your beans into the dry portafilter basket. Place it on your digital scales and aim for your target dose—around 18g for most double baskets. Using reliable scales like the Timemore Mini Espresso Scales is essential for consistency.
- Distribute Evenly: After grinding, the coffee forms a mound. A few gentle taps on the side of the portafilter will help settle the grounds. For even better results, a Weiss Distribution Technique (WDT) tool (fine needles) can break up clumps and create a fluffy, uniform bed.
- Tamp Firmly and Levelly: Place your portafilter on a level surface. Hold your tamper with a straight wrist and press down firmly until the coffee feels solid. The goal is consistent pressure (around 15kg) and a perfectly level tamp to prevent channelling.
Pulling the Shot and Reading the Signs
With your puck prepped, it's time for the main event. Empty the hot water from your cup, place it on the scales under the portafilter, lock the portafilter in, tare your scales to zero, and immediately start the extraction.
Your target is the golden ratio: a 1:2 brew ratio in 25-30 seconds. For an 18g dose, you're aiming for a 36g liquid espresso yield.
As the shot pulls, watch for these visual cues:
- The First Drips: After a few seconds, you should see dark, syrupy drops of espresso begin to form.
- A Steady Flow: These drops should quickly merge into a single, steady stream that looks like warm honey.
- Tiger Striping: You should see beautiful mottling of dark brown and reddish-caramel colours in the stream, a classic sign of a well-extracted shot.
- Blonding: Towards the end, the stream will get lighter. Stop the shot the moment you hit your target yield to avoid any bitter, watery flavours.
Every shot is a piece of data. If it’s too fast, grind finer. If it’s too slow, grind coarser. This feedback loop is exactly how you learn.
Mastering Silky Steamed Milk for Your Favourite Drinks
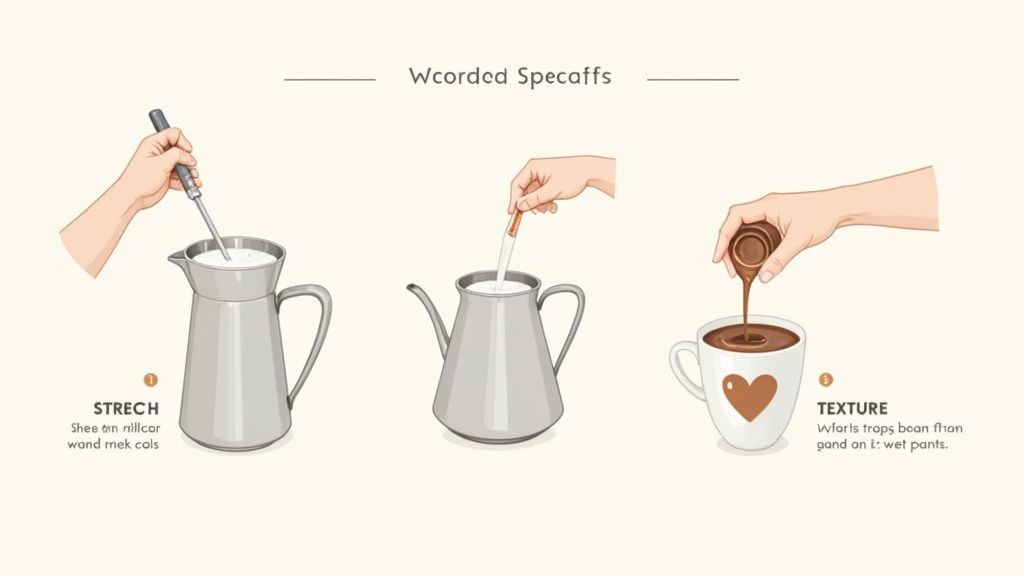
For many, the reason to learn how to make espresso at home is for a good latte, cappuccino, or flat white. Getting that glossy, microfoam texture isn't difficult once you understand the two-stage process: introducing air, then heating and texturising.
Starting with the Right Foundation
Always start with fresh, cold milk—straight from the fridge. Colder milk gives you more time to work before it gets too hot. Whole milk is the most forgiving for beginners due to its higher fat content, which helps create a richer texture.
Use a stainless steel jug that’s the right size, filling it to just below where the spout begins. This leaves room for the milk to expand.
The Steaming Process Explained
First, purge your steam wand for a second to clear out any condensed water. Now, submerge the tip just below the surface of the milk and turn the steam on to full power.
Phase One: Stretching the Milk
This is about adding air. Keep the steam wand tip near the surface so you hear a gentle "tsss-tsss" sound. Do this for a few seconds until the milk has grown in volume by about 20-30%.
Phase Two: Texturing the Milk
Sink the wand deeper into the milk, positioned slightly off-centre to create a swirling vortex. This spins the milk, breaking down large bubbles into a smooth microfoam. Keep going until the jug becomes too hot to comfortably touch (around 60-65°C). A Motta Dual Dial Frothing Thermometer can help you hit the perfect temperature every time.
Once done, turn the wand off, wipe it immediately, and purge it again. Tap the jug on the counter to pop any big bubbles, then swirl it to keep the milk glossy.
Your Guide to Classic Espresso-Based Drinks
Knowing the right ratios is key to recreating your coffee shop favourites. Here’s a quick guide to the classics.
| Drink | Espresso Ratio | Steamed Milk | Foam Level |
|---|---|---|---|
| Flat White | 1 Part Espresso | 2 Parts Milk | Minimal (Thin layer) |
| Latte | 1 Part Espresso | 3-4 Parts Milk | Low (Light layer) |
| Cappuccino | 1 Part Espresso | 2 Parts Milk | High (Thick layer) |
| Macchiato | 1 Part Espresso | Dollop of Foam | Foam Only |
Troubleshooting Common Home Espresso Issues
Pulling a bad shot is a rite of passage. Think of it as your coffee giving you feedback. Learning to diagnose these issues is a core skill in figuring out how to make espresso at home.
Sour, Watery Espresso (Under-Extraction)
Does your espresso taste unpleasantly sharp or acidic? This is under-extraction. The water has rushed through the coffee grounds too quickly.
The fix is about slowing the water down. Here’s what to adjust:
- Grind Finer: This is your number one tool. A finer grind creates more resistance.
- Increase Your Dose: Adding an extra 0.5g of coffee to the basket can also increase resistance.
- Check Your Tamp: Ensure you're tamping firmly and perfectly level to prevent channelling.
Bitter, Burnt Espresso (Over-Extraction)
If your espresso has a harsh, bitter, or burnt taste, you're dealing with over-extraction. The water spent too much time in contact with the coffee.
To correct this, you need to speed up the extraction:
- Grind Coarser: Make your coffee grounds slightly larger to reduce resistance.
- Decrease Your Dose: Using slightly less coffee (e.g., dropping from 18g to 17.5g) will also speed up the flow.
Choked Shots and Weak Crema
A choked shot is an extreme case of over-extraction; make your grind significantly coarser. If your crema is pale or thin, the cause is usually stale beans. Coffee needs to be fresh—ideally used within three weeks of its roast date.
Finally, keeping your machine clean is crucial. Oily residue can make every shot taste bitter, so regular backflushing with espresso machine cleaning tablets is non-negotiable. To prevent mineral buildup, regularly use an effective appliance descaler.
Your Home Espresso Questions Answered
Even with a detailed guide, a few questions always pop up. Let's tackle some of the most common queries.
What Is the Most Important Piece of Equipment?
Most experienced baristas will tell you that a quality burr grinder is the single most important bit of kit you can buy. An entry-level machine paired with a great grinder will always produce better coffee than a top-of-the-range machine paired with a cheap blade grinder.
A good grinder gives you the consistent, fine grounds you absolutely need for a balanced extraction and that lovely, rich crema.
How Often Should I Clean My Espresso Machine?
Think of cleaning as part of the brewing process. It's essential for flavour and making your machine last.
Here's a simple routine:
- After Every Shot: Rinse the portafilter and flush the group head with water.
- Daily: Do a quick backflush with just water at the end of the day.
- Weekly: Do a full backflush using a proper espresso machine cleaner to break down coffee oils.
- Every 1-3 Months: Descale your machine to get rid of mineral buildup, depending on the hardness of your water.
Can I Use Pre-Ground Coffee for Espresso?
While you can, we strongly advise against it if you're chasing café-quality taste. The moment coffee is ground, it starts losing flavour. By the time it reaches your kitchen, it's already stale.
The other major problem is that the grind size will almost certainly be wrong for your specific machine, making a good extraction nearly impossible. For the best possible flavour, always grind your beans fresh, right before you brew.
At Allied Drinks Systems, we believe everyone deserves to make café-quality coffee at home. From robust espresso machines and precision grinders to the freshest beans, we have everything you need to get started and perfect your craft.
Ready to begin your journey? Explore our complete collection of coffee supplies and equipment at ads-coffee-supplies.co.uk


